RESOURCES
CS RSRC 180P Interactive Case
Access — ORS Now
05/17/16 Revised 04/10/26
Training Completed 04/24/26 Last Reviewed 06/09/26
Introduction
ORS Now [previously known as Interactive Case Access System (ICA)] is the online case management system that allows participants to access specific Office of Recovery Services (ORS) case information, including payment information, case status, total balance, and monthly due information. The participant may also add new or updated address information, employment, and insurance information. ORS Now is available 24 hours a day, seven days a week and is a convenient alternative to the Interactive Voice Response System (IVR), and allows the participants to access specific case information without having to call the ORS Automated Information System (AIS). Participants may also use ORS Now to manage the Automatic Payment Withdrawal (APW) service online.
Authorized Access
ORS Now is available to all registered participants with an open case.
Requirements for Use
The registered participant must have a valid email address.
If the noncustodial parent (NCP) wishes to use ORS Now to make support payments, s/he must have a valid Social Security Number (SSN) and:
1. Visa®, MasterCard®, American Express®, or Discover Card® credit card;
2. Debit card with a Visa® or MasterCard® logo; or,
3. A checking account.
NOTE: There is a 2.9% fee for payments made using TouchPay.
Establishing Access and Creating an Account
To access case information in ORS Now,
the participant must create a UtahID account, which
they will use to log in to ORS Now. ORS Now can be accessed from the ORS homepage,
www.ors.utah.gov. To access ORS Now from
the ORS homepage, hover over “Child Support” in the
dropdown menu on the ORS webpage, then “Manage Your Case,”
then select “ORS Now.”

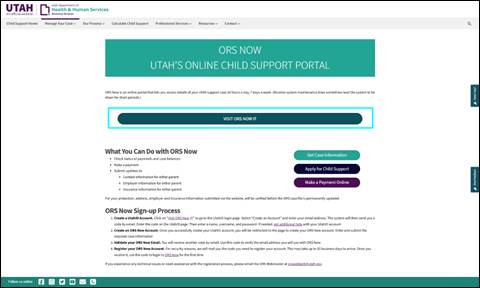
1. Access the ORS Now website through one of the methods listed below:
a. http://orsica.dhs.utah.gov; or,
b. www.ors.utah.gov and navigate to “ORS Now.”
NOTE: This takes the participant to the login page.
2. Click on Create an account to create a UtahID account. A UtahID is required to maintain access to ORS Now. Participants may use an existing UtahID login if they have one. If the participant needs to create a new UtahID, they must follow the steps below.
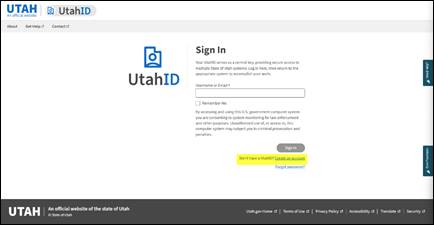
3. The participant is now on the first of five UtahID Creation screens. The entire process must be completed in order to successfully create a UtahID account.
NOTE: If the participant wishes to cancel account creation, they may select the Cancel Account Creation button at any time. If the participant cancels account creation, none of the information will be saved and the account creation process ends. The information must be re-entered if the participant later chooses to create a UtahID account.

a. Email Address –The participant’s email address that s/he wants associated with this account.
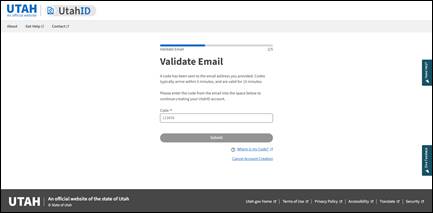
NOTE: An automated email with a one-time numerical verification code is sent to the email address provided in this field. This code is required to proceed with account creation.
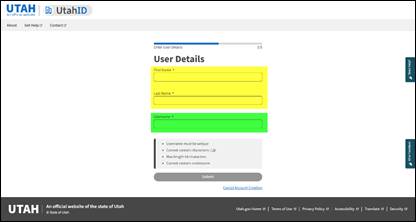
b. Name – The first line is the participant’s first name and the second box is his/her last name.
c. Username – This field is a 4-30 character identifier chosen by the participant, using both numbers and letters. It is not case-sensitive.
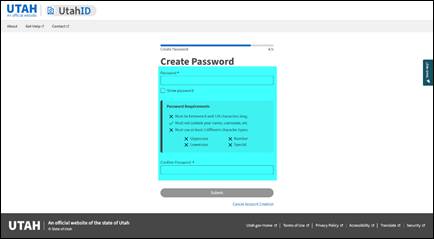

d. Create Password – The participant’s password associated with this account. The password must meet the listed requirements. Once the password is created, UtahID will display a confirmation message and allow the user to return to the Sign In page to sign in with the newly created UtahID.
4. The following fields on the Account Registration and Activation – Registration screen must be completed:
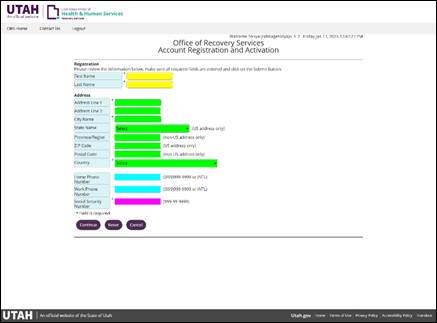
a. Name – There are two boxes associated with this field. The information typed in these fields needs to match the information listed in ORSIS exactly. Both fields in the Name field are required.
i. First – The participant’s first name; and,
ii. Last – The participant’s last name.
b. Address – This section has several boxes for the participant’s address. The fields are as follows:
i. Line 1 –The first line of the participant’s address (for additional information, refer to CS 051 Addressing Standards).
ii. Line 2 –The second line of the participant’s address. If the address is international, leave this field blank.
iii. City Name – The city of the participant’s address;
iv. State Name – The state of the participant’s address. This field can only be added if the participant’s address is in the United States (U.S.). If the address is international, leave this line blank.
v. Province/Region – The province/region of the participant’s address if s/he resides in another country.
vi. Zip Code – The participant’s zip code associated with his/her address. This field can only be added if the participant’s address is in the U.S.; and,
vii. Postal Code – The postal code associated with the province/region of the participant’s address if s/he resides in another country.
viii. Country – The country code associated with the participant’s address.
c. Home Telephone Number – The participant’s home telephone number. This field is optional.
d. Work Telephone Number – The participant’s work telephone number. This field is optional.
e. Social Security Number (SSN) – The participant’s SSN. This field is required. The client must enter a SSN that matches ORS records. If the client does not have a valid SSN, they will not be able to register for ORS Now.
f. Submit, Reset, Cancel – The participant uses these buttons to continue on with the registration process by either: submitting the application; resetting the application; or cancelling the application.
5. If the information entered matches a case in ORSIS, the Account Registration and Activation page updates to show that the registration process was successful by displaying the following message: “Thank you for completing your registration with ORS. An Activation Code will be sent to you by US Mail. You should receive the Activation Code in a letter in 5 to 7 business days. You must have this Activation Code to activate your account.”

Procedures – Activating an Account
After the participant registers for an account, s/he will receive the “Online Account Registration Letter,” from ORS, with an activation code. To activate the account, the participant must return to the website and continue creating their account. Access ORS Now website through one of the web addresses listed below:
· http://orsica.dhs.utah.gov; or,
· www.ors.utah.gov and navigate to “ORS Now.”
Complete the following steps:
1. Log into the ORS web page and access the ORS Now using the log in information from account creation (UtahID email address or username and password) and click “Sign In.”
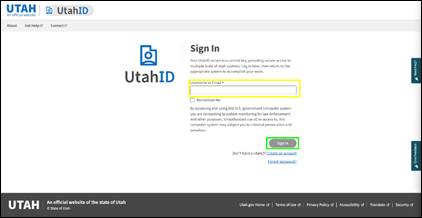
2. Update the Activation Code field with the activation code located on the letter from ORS and click Continue.


If the participant needs a
replacement code within one year of the initial request, s/he will need to access
the ORS website homepage and send an email to the “ORS Webmaster” at orswebtech@utah.gov. If it has been more
than one (1) year since the activation code was issued, it will have expired
and the participant must begin the registration process again. If the
participant needs to activate his/her online access, but
has misplaced their activation code letter and it has been less than one (1) year since the activation code was issued, s/he
can email orswebtech@utah.gov and request
the activation code again.
Maintaining Access
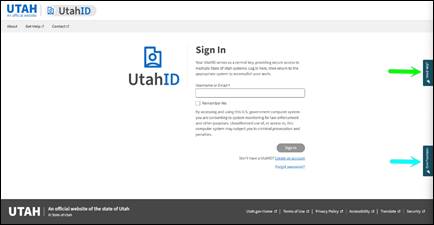
The only requirement for the participant to maintain access to ORS Now is to update or change his/her password every 90 days. The system will prompt the participant to change his/her password at the time they log in. If the participant has forgotten his/her password, they can click on the Forgot Password link located below the Email or UtahID and Password.

To recover the password, the participant must enter his/her UtahID username or email and click continue.

The participant is then prompted to verify the email address provided at registration. UtahID will send an automatically generated email with a security code that must be entered to proceed with password resetting.
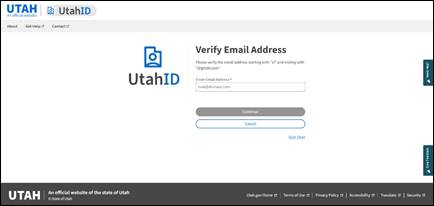

After the participant’s email address has been verified and the security code has been entered, the password may be reset. The new password must meet the Password Requirements listed on the Password Reset page.

When the password has been successfully reset, the participant is then logged in to UtahID.
If the participant needs assistance with the UtahID pages, they can select the “Need Help?” banner. Participants can provide feedback by selecting the “Give Feedback” banner.
Participant Options
Once the participant logs into ORS Now, s/he will be taken to the Interactive Case Access – Participant Information screen, which is the ORS Now homepage.
The options for the custodial parent (CP) and the noncustodial parent (NCP) are the same, with two exceptions:
1. NCPs are given the option to Make a Payment while the CP has an option to Change EFT/Utah Debit MasterCard® Telephone Notification.
2. If the participant is both the CP on one case and an NCP on another case, s/he will be able to view both options in the menu.
In addition to the Make a Payment and Change EFT/Utah Debit MasterCard® Telephone Notification options, the menu at the top of the page provides links to update the participant’s address (Provide Your Address), employer (Provide Your Employer), and insurance information (Provide Your Insurance). The Case List provides a list of each ORS case the participant is associated with. Each of the cases in the Case List can be selected for further processing.

1. Provide Your Address – To update or change an address, the NCP/CP may select this link to access the Provide Your Address screen. The following fields on this screen can be completed:

a. Your Telephone Number – The participant’s telephone number, including the area code;
b. Your Cell Phone Number – The participant’s cellular telephone number;
c. Your Email Address – The participant’s email address;
d. Name Addressee – The name of the addressee. This field populates automatically and cannot be changed;
e. Old Address – This section has several boxes for the participant’s previous address. The fields are as follows:
i. Line 1 –The first line of the participant’s address;
ii. Line 2 –The second line of the participant’s address;
iii. City Name – The city of the participant’s address;
iv. State Name – The state of the participant’s address. This field can only be added if the participant’s address is in the United States (U.S.);
v. Province/Region – The province/region of the participant’s address if s/he resides in another country;
vi. Zip Code – The participant’s zip code associated with his/her address. This field can only be added if the participant’s address is in the U.S.;
vii. Postal Code – The postal code associated with the province/region of the participant’s address if s/he resides in another country; and,
viii. Country – The country associated with the participant’s address.
NOTE: The participant’s address will need to match the address exactly as listed in ORSIS or an error message will be received.
f. New Address – This section has several boxes for the participant’s new address. The fields are as follows:
i. Line 1 – The first line of the participant’s address;
ii. Line 2 – The second line of the participant’s address;
iii. City Name – The city of the participant’s address;
iv. State Name – The state of the participant’s address. This field can only be added if the participant’s address is in the United States (U.S.);
v. Province/Region – The province/region of the participant’s address if s/he resides in another country;
vi. Zip Code – The participant’s zip code associated with his/her address. This field can only be added if the participant’s address is in the U.S.;
vii. Postal Code – The postal code associated with the province/region of the participant’s address if s/he resides in another country; and,
viii. Country – The country associated with the participant’s address.
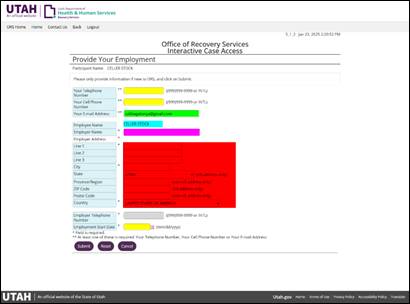
2. Provide Your Employment – To update employment information, the NCP/CP may select this option to access the Interactive Case Access – Provide Your Employment screen to update his/her employment information. The following fields on this screen can be completed:
a. Your Telephone Number – The participant’s telephone number including the area code;
b. Your Cell Phone Number – The participant’s cellular telephone number;
c. Your Email Address – The participant’s email address;
d. Employee Name – This field populates automatically and cannot be changed;
e. Employer Name – The name of the employer;
f. Employer Address – This section has several boxes for the employer’s address. The fields are as follows:
i. Line 1 – The first line of the employer’s address;
ii. Line 2 – The second line of the employer’s address;
iii. Line 3 – The third line of the employer’s address;
iv. City Name – The city of the employer’s address;
v. State Name – The state of the employer’s address. This field can only be added if the employer’s address is in the United States (U.S.);
vi. Province/Region – The province/region of the employer’s address if s/he resides in another country;
vii. Zip Code – The employer’s zip code associated with his/her address. This field can only be added if the employer’s address is in the U.S.;
viii. Postal Code – The postal code associated with the province/region of the employer’s address if s/he resides in another country; and,
ix. Country – The country associated with the employer’s address;
g. Employer Telephone Number – The employer’s telephone number including the area code; and,
h. Employment Start Date – The date the participant began employment.
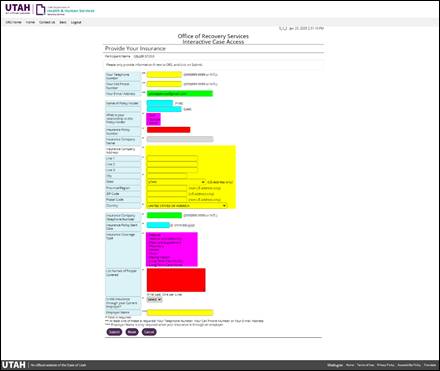
3. Provide Your Insurance – To update insurance information, the NCP/CP may select this option to access the Provide Your Insurance screen, where s/he can update his/her insurance information. The following fields on this screen must be completed:
a. Your Telephone Number – The participant’s telephone number, including the area code;
b. Your Cell Phone Number – The participant’s cellular telephone number;
c. Your Email Address – The participant’s email address;
d. Name of Policy Holder – The name of the policy holder;
e. What is your relationship to the Policy Holder – The NCP/CP’s relationship to the policy holder. The options for this field are as follows:
i. Self;
ii. Spouse; and,
iii. Other;
f. Insurance Policy Number – The Policy Number provided by the insurance provider;
g. Insurance Company Name – The name of the insurance company;
h. Insurance Company Address – This section has several boxes for the insurance company address. The fields are as follows:
i. Line 1 –The first line of the insurance company’s address;
ii. Line 2 –The second line of the insurance company’s address;
iii. Line 3 –The third line of the insurance company’s address;
iv. City Name – The city of the insurance company’s address;
v. State Name – The state of the insurance company’s address. This field can only be added if the insurance company’s address is in the United States (U.S.);
vi. Province/Region – The province/region of the insurance company’s address if s/he resides in another country;
vii. Zip Code – The insurance company’s zip code associated with his/her address. This field can only be added if the insurance company’s address is in the U.S.;
viii. Postal Code – The postal code associated with the province/region of the insurance company’s address if s/he resides in another country; and,
ix. Country – The country associated with the insurance company’s address;
i. Insurance Company Phone Number – The insurance company’s telephone number including the area code;
j. Insurance Policy Start Date – The effective date of the insurance policy;
k. Insurance Coverage Type – The type of coverage for this insurance policy. The options are as follows:
i. Medical;
ii. Dental; and
iii. Vision;
l. List Names of People Covered – The names of the people covered on the insurance policy;
m. Is this Insurance through your Current Employer – An indicator showing whether or not the insurance policy was obtained through the NCP/CP’s employer. The two options available for this field are:
i. “Y” – Yes; and,
ii. “N” – No; and,
n. Employer Name – The name of the Employer associated with the insurance policy.
4. Change EFT/Utah Debit MasterCard® Telephone Notification – The CP may select this option to access the Interactive Case Access – Change EFT/Utah Debit MasterCard® Telephone Notification screen where s/he can update his/her EFT. If selected, this option sets up the Telephone Notification to let the CP know when the payment has been sent. The codes for this field are “Yes” or “No.”

When the CP accesses this page, if s/he has not previously set up direct deposit or a Utah Debit MasterCard®, a message displays prompting him/her to click on the Direct Deposit/EFT or Utah Debit MasterCard® button. The CP is taken to the ORS home page where s/he can set up direct deposit or a Utah Debit MasterCard®.
NOTE: Once the CP is set up for direct deposit or a Utah Debit MasterCard®, s/he is taken to the telephone notification screen where s/he can add the phone number ORS Now should call when a payment has been sent to his/her bank account or on his/her Utah Debit MasterCard®.
Procedures – Make a Payment
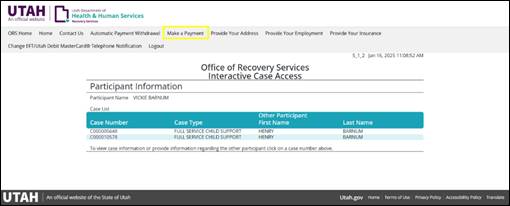
To make a payment through TouchPay, the NCP can select the Make a Payment link to access the TouchPay Interface. The participant will then be routed to TouchPay and must follow the prompts to complete the payment.

Procedures –
Automatic Payment Withdrawal (APW)
The Automatic Payment Withdrawal (APW) menu allows clients to view or update APW details, display the Terms and Conditions of APW, and terminate their payment agreement. To access the APW menu, click the “Automatic Payment Withdrawal” button on the home screen.

If the participant has an APW agreement in place with ORS, the APW menu will display. Select “I want to change my payment schedule or financial account” to access the Scheduler User Dashboard. This allows users to change their payment schedule, contact information, and payment method.

The Scheduler User Dashboard contains the following links:

i. Edit Payment Schedule – This link takes participants to the Edit Payment Schedule page. On this page, participants can select a new payment schedule from a list provided by the schedule and can select a new start date for upcoming payments;
ii. Edit Payment Method – This link takes participants to the Edit Payment Method page, where they can view, update, or add a new payment method;
iii. Edit Contact Information – This link takes participants to the Edit Contact Information page in order to view, update, or add contact information;
iv. Dashboard – Clicking this link from anywhere in the scheduler will navigate to the Scheduler User Dashboard; and,
v. Exit Scheduler – Use this link to exit the scheduler and return to the ORS Now home.
If the participant does not have an APW agreement in place, the APW link will direct the participant to the Terms and Conditions page, where the participant must acknowledge and accept the terms before continuing.

Once the participant has agreed to the terms, they will receive an approval message stating they are now approved to use the APW service. If the participant does not agree to the terms, they will not be eligible to use the online APW service through ORS Now.
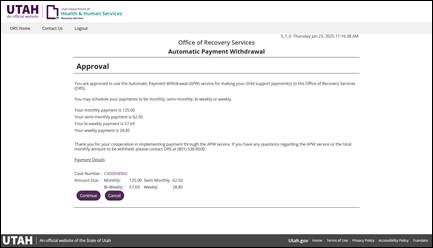
After the approval message, the participant will be directed to set up their payment information and payment schedule.

To terminate an APW agreement, the participant must select “I want to terminate my payment agreement” from the list in the APW menu.

The Termination page displays a warning message which the participant must read and accept in order to continue termination. Press Continue to continue with APW termination or Cancel Termination to return to the APW menu.
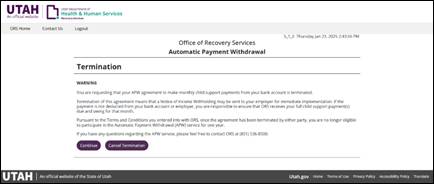
After the APW agreement has been terminated, the participant will receive an auto-generated email confirmation.

NOTE: If the participant previously terminated the APW agreement and later wishes to use the APW service and receives a message stating their application was denied, review the DISQUALIFIED UNTIL date on the participant’s appropriate screen in ORSIS. If necessary, update the date to the current date and instruct the participant to try to reinstate the APW service after the DISQUALIFIED UNTIL date in ORSIS passes.

Procedures – APW Payment Methods
The APW service allows participants to select their preferred payment method from a list of options. Participants can add or edit payment information for the APW service by clicking the appropriate option on the APW menu page through the Scheduler User Dashboard. This takes the participant to the Select Payment Methods screen. The Select Payment Methods screen includes the Credit Card and Electronic Check options.
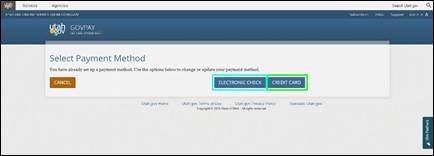
1.
Credit
Card – Clicking on this option
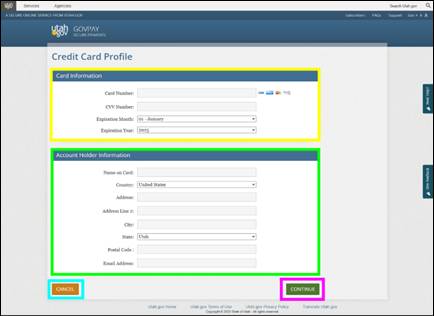
directs the participant to the Credit Card Profile screen. The Credit Card Profile screen provides the following required
fields to process a credit/debit card payment transaction:
a.
Credit Card Information
i.
Card
Number – The credit/debit card number found on the front of the card;
ii.
CVV
Number – The Card Verification Value number is a 3-4
digit security code located on the front or back of the card; and,
iii.
Expiration
Month – The month that the credit/debit card expires; and,
iv.
Expiration
year – The year that the
credit/debit card expires.
b.
Account Holder Information
i.
Name on
Card – First and last name as it shows on the card;
ii.
Country –
The country of residence for the account holder;
iii.
Address –
The first address line for the account holder;
iv.
Address
Line 2 – This is an optional second address line for the account holder;
v.
City
– The city of residence for the account holder;
vi.
State
– The state of residence for the account holder;
vii.
Postal
Code – The postal code for the account holder; and,
viii.
Email
Address – The account holder’s email address. This field is optional.
c.
Cancel – Clicking on the
Cancel button will cancel the payment and take the participant back to the
Scheduler User Dashboard screen.
d.
Continue – Clicking
on the Continue button will continue with the payment.
Once the payment information has
been entered and Continue has been selected,
the participant will be directed to a verification screen. This screen will
allow the participant to verify the payment information entered and be provided an option to select either Yes, the information is correct,
No, the
information is not correct, or the participant may choose to Cancel the payment. If Yes is chosen,
the participant will be taken to the Payment Receipt screen and have a choice
to Print the receipt or to continue
to be redirected back to the ORS Now homepage. If No is chosen, they are returned to the previous page to change the
information. If Cancel is chosen,
the payment will be cancelled and he/she will be
redirected back to the Scheduler User Dashboard screen.
2.
Electronic
Check – This is an electronic version of a paper check used to conduct
transactions over the Internet. The Electronic Check Payment screen provides
the following required fields to process an electronic check payment
transaction:

a.
Check Account Information
i.
Routing
Number – A routing transit
number that consists of nine digits located at the bottom of a check that
identifies the financial institution on which the payment is drawn.
ii.
Bank Name
– The name of the financial
institution;
iii.
Account
Type – The type of account being used for the payment.
A. Consumer Checking – A consumer (personal) checking account;
B. Consumer Savings – A consumer (personal) savings account; and,
C. Commercial Checking – A commercial (business) checking account.
iv.
Account
Number – The financial account
number located at the bottom of the check.
b.
Account Holder Information –
Financial account holder information.
i.
Bank
Account Holder’s Name – The first and last name of the financial account
holder;
ii.
Address
Line 1 – The first address line of the financial account holder;
iii.
Address
Line 2 – This is an optional second address line of the financial account
holder;
iv.
City – The city of residence of the financial
account holder;
v.
State – The state of residence of the financial
account holder;
vi.
Postal
Code – The postal code of the
residence of the financial account holder; and,
vii.
Email
Address – The financial account
holder’s email address. This field is optional.
c.
Cancel – Clicking on the
Cancel button will cancel the payment and take to the participant back to the Scheduler
User Dashboard screen;
d. Continue – Clicking on the Continue button will continue with the payment.
Once the payment information has been entered and Continue has been selected, the participant will be directed to a verification screen. This screen will allow the participant to verify the payment information entered and be provided an option to select either Yes (the information is correct), No (the information is not correct), or to Cancel the payment. If Yes is chosen, the participant will be taken to the Payment Receipt screen and have a choice to Print the receipt, or to continue which will take him/her back to the home page. If No is chosen, the participant is returned to the previous page to change the information. If Cancel is chosen, the payment will be cancelled and he/she will be redirected back to the Scheduler User Dashboard screen.
Procedures – Case Information
To view specific case information, obtain payment information and to update the other participant’s information, the NCP/CP must select a case number at the bottom of the home screen by clicking on the appropriate case link.
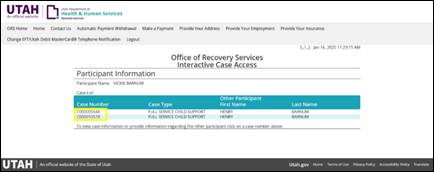
When a specific case is selected, the following screen will appear and the participant may select different options:
1. Provide Other Participant’s Information – On the left side of the screen is a menu box providing options to update the other participants’ address (Provide Other Participant’s Address), employer (Provide Other Participant’s Employment), and insurance information (Provide Other Participant’s Insurance). These screens are the same, including the format and fields as the screens accessed to update or change his/her own information.
NOTE 1: When employment or insurance information is provided to the office for the other participant, a Customer Service Unit Senior Agent forwards the email to the assigned agent to review and update the appropriate ORSIS screen(s) for the case, as well as add a narrative.
NOTE 2: When a new address is provided by a participant for themselves, the address is updated on ORSIS. When the new address is provided by a participant for another participant, the address is added to ORSIS as a pending address, the assigned worker will an alert. The worker may call the participant to verify the address or verify the address by sending the “Post Office Request for Address Information” form. Once the form is returned to our office, the assigned agent will update the case appropriately.
2. View/Print Payment History – Selecting this option allows a participant to view and print a child support or spousal support payment history.
3. Last 12 Months of Payments Received for this case – This tab automatically defaults to the last 12 months of payments received on this case. This tab shows the date the payments were received, the receipt number, and the payment amount.
4. Last 12 Months of Payments Sent for this case – This tab shows the dates the payments were sent to the CP and the amount of the payment.
5. Monthly/Total Amount Due for this case – This tab shows the total monthly amount due for current support and arrears as of the current date.
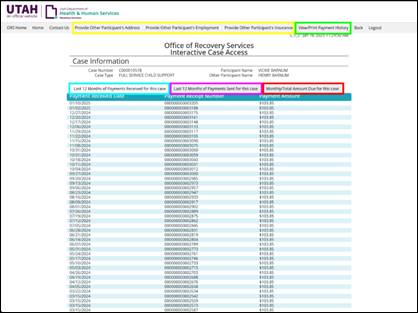
NOTE: Case balances and amounts due are updated daily.
Procedures – Generating a Payment Record
Complete the following fields to generate a payment record:
1. Start Date – The start date of the time period for the requested payment history;
2. End Date – The end date for the time period for the requested payment history;
3. Report Type – The participant must choose the type of payment. The options for this field are:
a. Child Support; or,
b. Spousal Support; and,
4. Click Submit.
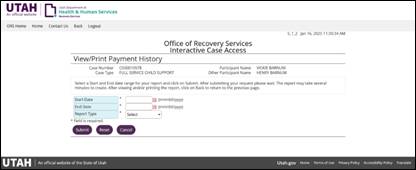
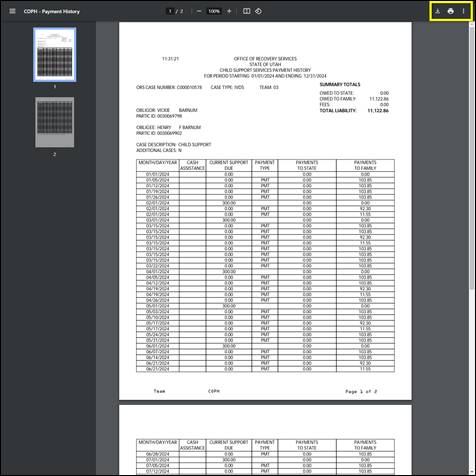
NOTE: The payment history will open as a downloadable Portable Document Format (PDF) in the computer’s default program for viewing PDFs. From there, the payment history can be downloaded or printed by right clicking and selecting the Print option to download or print, or by using the Print icon in the settings.
The payment history contains the following information:

1. Monthly Breakdown:
a. Cash Assistance – An “N” indicator showing when the CP was not on cash assistance;
b. Current Support Due – The monthly amount of support due;
c. Payment Type – “PMT” indicator on the months a payment was received;
d. Payments to State – The dollar amount paid to the state during that month; and,
e. Payments to Family – The dollar amount paid to the family during that month.
2.
Summary Totals:
a. Owed to the State – Total amount owed to the state;
b. Owed to the Family – Total amount owed to the family;
c. Fees – Total amount of fees, if applicable; and,
d. Total Liability – The total amount owed on the case.
To print the payment history:
i. Right click anywhere on the document and select the option for “Print”;
A. From there, you can print the document on your local printer; or
B. Use the Print as PDF option to download the PDF.
ii. Select the printer icons on the mouse and a menu will display with Print listed as one of the options.
A. Click the Print option;
B. Verify the correct printer; and
C.
Click Print.